Home » Home Improvement
Category Archives: Home Improvement
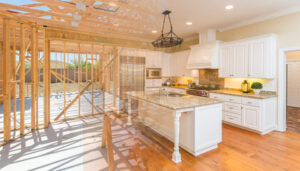
Tips for Successful Kitchen Remodeling
Nashville Kitchen Remodeling is an opportunity to make the most-used room in your home fit your style and lifestyle. The result is a fresh new look that also increases home value.
A remodel can also address functional issues like an inefficient layout that makes dinner prep a chore. Adding storage options and energy-efficient appliances can reduce utility costs.
The cost of kitchen remodeling can vary widely, depending on the scope and quality of materials selected. However, there are a number of steps that can be taken to manage costs and ensure that the remodel aligns with the homeowner’s goals and budget.
The first step is to determine the level of change needed. For a minor remodel, the average cost is around $10,000 to $15,000. This includes cosmetic changes such as painting walls, replacing appliances, and adding new cabinets. It also includes minor electrical upgrades and the addition of durable countertops and flooring. These changes can dramatically refresh a kitchen without the significant investment of a major remodel.
During the design process, homeowners should create a three-tier list of changes that reflect their priorities and resources. The lowest tier should include the “needs,” or the changes that are necessary for the function of the kitchen. The next tier should include the “wants,” or the changes that would improve the function of the kitchen but aren’t necessarily vital. Finally, the top tier should include the “luxuries,” or the changes that add the most value to the kitchen.
One way to reduce costs is by limiting the number of custom features. Many items such as tile, stone, and custom cabinetry have long lead times that can increase the project timeframe. To avoid this, homeowners should select standard or semi-custom options that offer a high level of style and functionality at a more affordable price point. Another way to manage costs is to obtain detailed quotes and consultations from qualified contractors. These experts can help homeowners create a well-informed budget that ensures the project is completed to the homeowner’s exact specifications.
Design
The kitchen is the heart of your home and where much of the household activity takes place. It’s important to have a well-organized kitchen layout that is comfortable and functional. Whether you’re a cook who loves to entertain or just want a better space to prepare meals, the right remodel can make all the difference.
Before starting the project, you need to decide what your goals are for the kitchen remodel. This will help you narrow down the options and focus on the things that matter most to you. You should also consider the current needs of your family and how they use the kitchen to determine the type of layout that will best serve them.
Some homeowners have dated kitchens that don’t reflect their style or functionality. These are good candidates for a kitchen remodeling job that will give you the updated cooking space you’ve always wanted.
A full-custom kitchen design is a great option, but it’s expensive. Moving appliances or cabinetry can be costly, and structural changes to your house will add even more. If your budget is limited, you can still achieve the look and function of a new kitchen by incorporating some cost-effective tricks.
For example, if you’re on a tight budget, consider painting cabinets instead of replacing them. You can also add a banquette seat to an empty corner or install open shelves in lieu of upper cabinets for storage. You should also invest in a fire-rated extinguisher, and choose clipped or rounded corners for countertops to prevent injuries from sharp edges. Another great trick is to choose energy-efficient appliances and lighting, which will save you money on utility bills in the long run.
Layout
When you’re remodeling your kitchen, one of the most important considerations is its layout. The layout determines how your space functions, which appliances you can accommodate, and how your kitchen connects with the rest of the house. There are several layout options to choose from, including L-shaped, U-shaped, and galley kitchens. Each type has its pros and cons, so it’s important to consider your priorities before choosing a layout.
While traditional kitchen layouts may work for some homeowners, they don’t always fit today’s lifestyles. For example, placing the sink near a wall restricts countertop space and hampers workflow. Placing the oven or dishwasher in a corner exposes them to heat and splatters, which can damage the hardware. Additionally, an outdated layout often limits natural light.
A dated kitchen can also feel too small and limited in storage. This is where kitchen remodel ideas come in handy, such as reworking existing features to boost storage without changing the overall layout. For example, in this kitchen by Studio Peake, a few upper cabinets were removed to create open shelving for plate storage and display.
Whether you’re using a standard layout or designing your own, the process of kitchen remodeling can be noisy, messy, and time-consuming. To help you stay on track and keep costs under control, make a list of your priorities and stick to it. It’s also important to offer feedback to your contractor so they can correct any issues quickly. Also, if possible, try to take a vacation during the construction phase to avoid living in a construction zone for too long.
Appliances
The appliances you choose for your kitchen are one of the most significant decisions in the remodel process. They affect the entire design, influencing cabinetry layout, counter space, and even color schemes. Choosing the right appliances ensures your kitchen will be functional and stylish.
A wide range of appliance options exist, from mainstream brands that offer reliability and performance at an accessible price to premium brand names that elevate your kitchen into a culinary haven. Mainstream brands often offer standard appliance packages that include all essentials—refrigerator, oven, microwave, dishwasher and sink. This can be a great option for homeowners on a budget who still want to update their kitchens.
If you’re looking to add some personality to your kitchen, unique appliances can make a statement and serve as conversation starters. From coffeemakers that brew up a rich cup of joe to sous vide machines that cook meals to perfection, you can find many unique appliances on the market. However, it’s important to prioritize features that align with your lifestyle and cooking needs.
It’s also important to consider the style and finish of your appliances when selecting them. A sleek stainless steel look is popular in contemporary kitchens, while traditional designs pair well with custom cabinetry. Lastly, consider the energy efficiency of each appliance to reduce your utility bills and carbon footprint.
Another trend is to hide your appliances behind stylish cabinet fronts and panels, ensuring a seamless aesthetic. This is especially helpful in open-plan living spaces where the kitchen is visible to living or dining areas. Additionally, appliances that match your cabinetry can help keep the overall design on-budget and on-time.
Lighting
Light fixtures are often the most expensive element of a kitchen remodel, and the quality you choose can make or break the look of your new space. Adding multiple layers of lighting helps to illuminate the room and set the mood you want. For example, recessed lights with dimmers and table lamps can provide a warm and inviting atmosphere while also creating zones within your kitchen.
The type of lighting you select will depend on the style of your kitchen and your personal taste. For example, oversized pendants are ideal for kitchens that feature an open floor plan. They can add a sense of elegance to the space and draw attention to key design features such as artwork or floating shelves.
You’ll also need to consider the amount of natural light your kitchen gets, as that can impact how bright or dark you want the space to be. If you don’t have a lot of windows, installing skylights or a solar tube can help to brighten the area.
There are three types of lighting to consider: ambient, task, and accent. Ambient lighting can be provided by a ceiling light fixture or other large light source, such as a chandelier. Task lighting can be provided by pendants over the island or under-cabinet lighting to shine on work surfaces and eliminate shadows. Accent lighting can be added with a toe-kick or on the lower edge of a cabinet, or it can be used to highlight special features like a tile feature or artwork.
The right light fixtures can take your kitchen renovation to the next level. With smart options and more designs to suit any style, you can create a functional, beautiful space that you’ll love spending time in.
Cabinet Painting – Preparing Your Cabinets
Cabinet Painting Sacramento is a time-consuming process that requires careful prep and precise application to achieve high-quality results. Using the right paint and proper surface preparation ensures your cabinets will stand up to everyday wear and tear and resist moisture.

Before you begin, take cabinet doors and drawers off the hardware and place them in a safe spot for reassembly. Then, use a foam sanding block to lightly scuff the surfaces of cabinets, drawers and doors, which will give primer something to adhere to.
Before beginning any paint job, it is essential to choose the right type of paint for your surface material. While regular wall paints are suitable for many surfaces, cabinet painting requires more durable and moisture-resistant materials.
Cabinet paints are formulated with more resins and special pigments that make them more resistant to scratches, staining, and fading. They are also often designed to hide imperfections and provide a smooth, high-quality finish. As a result, they tend to have higher price tags than regular wall paints, but the extra cost is well worth it for the added durability and beauty that cabinet paints offer.
The main types of cabinet paint include latex, oil-based, and alkyd enamel options. Oil-based paints have long been favored by professional painters because they provide a hard-wearing finish that is more durable than latex options and resists chipping and peeling. However, they require more extensive surface preparation and can produce strong odors during application.
Latex paints are water-based and much less expensive than oil-based products. They dry quickly and offer a wide range of colors and finishes, including eggshell or flat options that help to conceal imperfections in the surface. Additionally, there are also a number of low-VOC or eco-friendly options that minimize harmful fumes during application. However, they may not hold up as well against the wear and tear of busy kitchens as oil-based or alkyd enamel paints.
Alkyd enamels are more durable than latex options but they can be difficult to work with because of their slow drying times and the need for a solvent like mineral spirits to thin them. They can also yellow over time, so they are less suitable for white cabinets than their oil or enamel counterparts.
In recent years, hybrid cabinet paints have been introduced that combine the easy clean-up and low VOC of latex paints with the durability of alkyds. These paints can be used on both wood and melamine surfaces and come in a variety of sheen levels from satin to semi-gloss. They are an excellent option for achieving a polished look that is both durable and beautiful in busy kitchens.
Paint Color
Your cabinets see a lot of action on a daily basis, whether you’re reaching for a pot or plate or opening and closing a cabinet door. This is why it’s important to use a high-quality paint that resists chipping and staining – even in a busy kitchen like yours. Cabinet paints are often more expensive than regular wall paint, but the extra cost is well worth it for a durable finish that stands up to wear and tear.
When choosing a cabinet paint color, it’s best to choose one that coordinates with other fixed elements in the room, such as countertops and backsplashes. Likewise, you’ll want to take into consideration the color of any hardwood floors or window trim you plan on painting, as these colors will also influence your choice.
Once you’ve chosen a color, be sure to test it out before applying it to your cabinets. Ideally, you should apply the sample to a flat surface that’s easy to sand and cover up if it turns out not to be the right color for your space. Avoid putting it into nooks and crannies, as this will be much more difficult to get rid of later.
It’s also a good idea to apply the sample in different lighting throughout the day to see how it looks under natural and artificial light. This will help you determine the true color, as it may look very different in some situations than others.
Many professional painters choose to prime all surfaces before they begin painting cabinets, especially if you’re using a dark color. Primer creates a solid base that allows the finished coat of paint to adhere and blend properly. Once the primer is dry, you can start painting. Be sure to follow the manufacturer’s directions for drying times, as these can vary greatly between products.
Once the doors and drawer fronts are painted, it’s time to reattach their hardware and hang them back on their boxes. If you’ve taken your hardware apart, make sure to label each piece with its corresponding door and placement (we recommend using sticky notes). Once everything is back together, it’s time to admire your work!
Surface Preparation
Surface preparation is an important step to ensure that the new paint will adhere to the cabinets. This can be achieved either chemically or mechanically. Chemical cleaning removes contaminants such as rust, mill scale, oil and grease that can affect adhesion. Mechanical methods can include sanding, grinding or shot blasting. These techniques physically remove the impurities to create a new, textured profile on the surface that will promote adhesion.
Once the old coatings and loose dirt have been removed, a new primer can be applied to the surface. This will help to seal knots and voids, ensuring that the final coat of paint will adhere properly. If the cabinets are heavily stained, a stain-blocking primer may also be needed to prevent the color from bleeding through the topcoats.
Before applying any priming or painting products to your cabinet surfaces, it’s recommended that you perform a light sanding with 220-grit sandpaper. This will give the primer a better grip and prepare the cabinet for the next steps in your project. After sanding, it’s crucial that you wipe the surfaces down with a damp cloth and degrease them if necessary. Degreasing is especially crucial for kitchen surfaces where grease buildup can be problematic.
After sanding, vacuum the cabinet doors and drawer fronts to remove any lingering dust particles and to make sure that you have a smooth surface for your primer or paint product. Degrease the surfaces again if necessary, especially on kitchen doors and drawer fronts to prevent buildup of food grime that can inhibit a smooth surface.
It’s essential that your cabinet surfaces are completely dry before you apply your primer or finish, and it’s recommended that you allow for proper drying times per manufacturer recommendations. Moisture trapped between wet-applied coatings and their surfaces can cause pinholes during the curing process, resulting in small holes under the coating once it dries. This can impact the durability of the coating and lead to premature failure. Moisture on the surface can also impede drying and result in blistering and peeling.
Painting Technique
Cabinets are usually painted with several coats of primer and paint to create a durable surface that will resist wear and tear. A good quality oil-based primer is often used as it will adhere to the wood better than water based paints. Water-based acrylic or enamel paints are then applied in thin coats to ensure proper coverage. This is followed by a top coat to seal in the color and protect the cabinets from moisture.
Before beginning the cabinet painting process, the surfaces must be clean to remove any grease or dirt. This can be done with liquid degreaser or trisodium phosphate (TSP). The areas closest to fixtures, such as the sink and stove, will likely contain more grease and should be cleaned thoroughly with both the degreaser and TSP.
If your cabinets have previously been stained, you may need to fill and caulk any old nail holes or knot holes. This will be especially important if you are using a dark stain or color as these areas will show through the lighter paint.
After all of the surfaces are clean, it’s time to sand them. This is a very important step as paint will not adhere well to smooth or shiny surfaces. A light sanding with 100 or 150-grit sandpaper will prepare the surface for priming.
Many professional painters use a high-quality foam roller for large flat surfaces and a soft-bristled brush to cut into tight spots and corners. It is also important to apply the paint in thin layers rather than a thick coat as this will prevent chipping later on. Following the manufacturer’s recommended drying times between coats is also essential.
Stenciling is another technique that can add a unique look to your kitchen cabinets. Whether you use a simple solid design or an intricate floral pattern, stenciling can add visual interest and complement your style. If you decide to stencil, make sure the tape is secure and that the stencil is well-positioned to avoid any smudging or unwanted paint underneath.
Once you’ve completed the painting process, you can replace your cabinet doors and begin putting everything back together! Before you do, make sure to label each door with a number and place corresponding tape on the inside of the cabinet or the shelf. This will help you easily match up the doors when it comes time to rehang them!